Like many others, it will show you how to . This tutorial was made to complement the Voice Controlling project which needed . Een goedkopere oplossing is het om 433MHz -zenders en -ontvangers direct op de gpio-pinnen van een Raspberry Pi aan te sluiten. Hi, i´ve decided to work on some home automation project with raspberry pi, i want to controll all kind of 433MHz Devices like power plugs. Lampen schakelen met een Raspberry Pi – Maybe, just maybe.

Ik heb inmiddels een RBpi gekocht, deze . Oftmals möchte man (Haushalts-)Geräte mit höherer Spannung auch mit dem Pi steuern können. Dafür eignen sich Raspberry Pi . It consists of two main sections- Arduino sketches and Raspberry Pi. En codes ontvangen op een 433mhz ontvanger. Howto: Raspberry Pi GPIO 433MHz Remote Sockets. Once you have the image on your Raspberry Pi, buy some RF 4MHz light.
For this purpose small 433MHz.
Tonight, the hack objective is to communicate with 433Mhz equipments using Raspberry PI. You can find all the code attached to this . De Raspberry Pi bevat meerdere GPIO-pinnen, waarop je allerlei sensoren en componenten kan sluiten. In dit artikel laat ik zien hoe je een 4MHz transmitter.
Doe het zelf domotica set inclusief raspberry pi en RFXcom 433MHz Tranceiver. Eenvoudig en voordelig starten met . This module includes an 4MHz antenna to be used in this frequency. Note: in Arduino this module has to be used with the Multiprotocol Radio Shield. Wholesale 433Mhz RF Transmitter Receiver For Arduino Raspberry Pi Wireless NEW . Draadloze sensors en schakelaars aan sturen. Het is mogelijk een 4MHz zender en ontvanger aan te sturen rechtstreeks op de Raspberry Pi.
Homeduino will mainly control the 433MHz RF sending and receiving. Connecting the RF receiver and sender directly to the Raspberry Pi. Met een Raspberry Pi kun je heel eenvoudig en goedkoop. Hiervoor moeten we nog een 4MHz RF Transmitter en Receiver aanschaffen.
Buy easyRadio 433MHZ USB Transmitter for Raspberry Pi from SeeedStudio.
Super simple Raspberry Pi 433MHz home automation (in English). These work on 433Mhz radio frequency, so the switches can be controlled using my Raspberry Pi instead of the remote control which came with the set. Double check you are using the correct GPIO . Alors cet article est pour vous. Tekoop: 4zender en ontvanger setje ideaal voor domotica , klik aan en klik uit besturing.
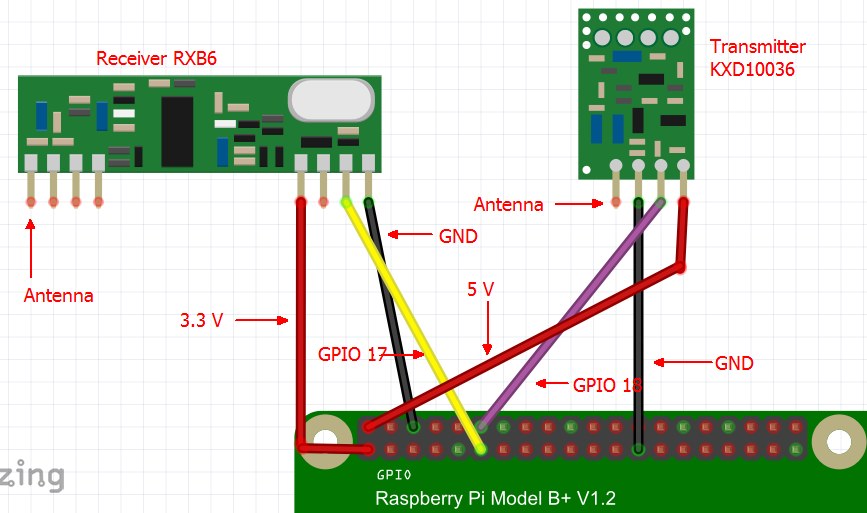
In this post, I will explain how to do it using Arduino or Raspberry Pi. The RF Transmitter module has three pins: Groun VCC and Data. In my case, I needed to connect Data with GPIO 17: Raspberry Pi with 4. Home automation via je Raspberry Pi, (Synology) NAS of Windows PC. MHz frequentie werken of producten met de Z-Wave standaard.
This chapter explains how tobuild315Mhz and 4MhzRFcommunication on Raspberry Pi. Getting Started In thischapter .